If you have never grown mushrooms before, a ready to fruit oyster mushroom block is probably the easiest place to start. You do not need to know how to make grain spawn, work with agar, use a pressure canner, or build anything resembling a laboratory. Most of that can come later if you decide you are interested.
A ready to fruit block has already had most of the difficult work done for you.
The block is usually a plastic bag filled with material the fungus can grow on, called a substrate. For oyster mushrooms this is often hardwood sawdust, straw, or a mixture made from plant materials. The substrate has already been inoculated with mushroom culture and allowed to become colonized.
Inoculated just means that mushroom culture has been introduced to the substrate.
Colonized means the fungus has grown through most or all of that material. The white growth you see inside the bag is usually mycelium, which is the main body of the fungus. The mushroom is the temporary reproductive structure produced by that fungus.
By the time you receive a ready to fruit block, you are basically taking over when the fungus is already established and ready to make mushrooms.
In some ways, I think growing oyster mushrooms from one of these blocks is easier than growing a plant. You do not have to germinate a seed, transplant anything, fertilize it, figure out soil fertility, or wait months to see what happens. The organism is already alive and growing inside the block. Your part is mostly providing the conditions that tell it this is a good time to make mushrooms.
That is one reason I think fruiting blocks are such a good introduction to mushroom growing. You get to see a large part of the fungal life cycle without needing to learn everything else first.
Why Start With Oyster Mushrooms?
There are a lot of mushrooms you can cultivate, but oysters are particularly forgiving.
They grow aggressively, produce mushrooms fairly quickly, and generally tolerate a wider range of conditions than some other cultivated species. That does not mean you can put a block anywhere and forget about it. They still need the right temperature, moisture, fresh air, and some light.
But there is quite a bit of room for learning.
Depending on the block and your conditions, you may begin seeing tiny mushrooms within several days.
Those tiny developing mushrooms are called pins.
Once oyster mushrooms begin pinning, things happen quickly. A cluster that is barely noticeable one morning can look completely different a day or two later. I think this is one of the more interesting parts of growing them. Plants change constantly too, of course, but oyster mushrooms can make those changes very obvious.
Not All Oyster Mushrooms Are the Same
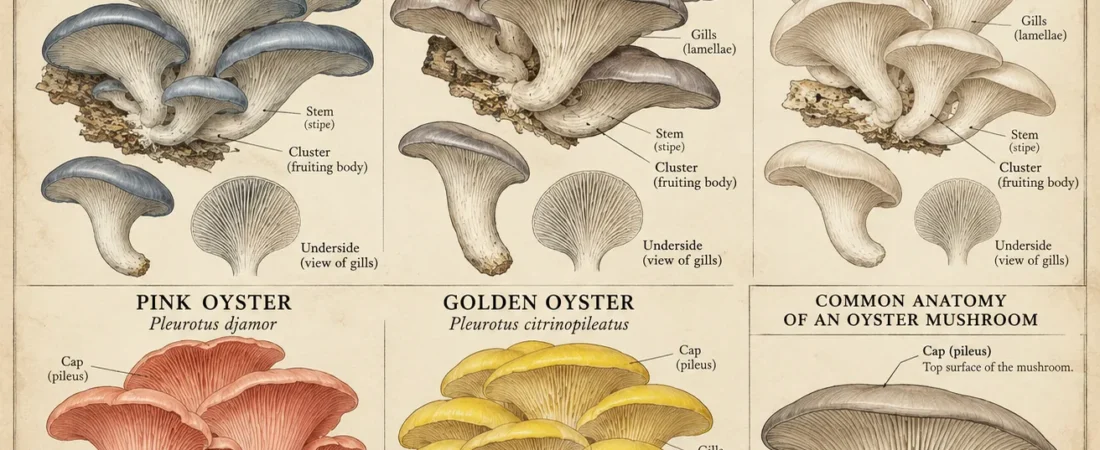
“Oyster mushroom” does not refer to only one mushroom. There are multiple species and varieties in the genus Pleurotus, and they do not all grow exactly the same way.
If you start shopping for a fruiting block, these are some of the common types you are likely to encounter.
Blue Oyster Mushrooms
Blue oysters are probably one of the first ones I would recommend.
When young, the caps can have a noticeable blue or blue gray color, although that color usually becomes less dramatic as they mature. They produce the familiar clusters of overlapping oyster shaped caps.
Blue oysters generally prefer cooler conditions than some of the warm weather oysters. They are vigorous growers and are commonly sold for beginner cultivation.
They also give you that classic oyster mushroom cluster, which makes them a satisfying first mushroom to grow.
Italian Oyster Mushrooms
Italian oysters are another one I would recommend for a first grow.
They produce the familiar clusters of broad oyster shaped caps and are usually gray to brownish in color. They are vigorous growers and can be fairly forgiving under normal indoor conditions.
They also fall into that useful middle ground where they are interesting enough to feel different from a grocery store button mushroom, but they are still straightforward to grow and cook.
If I were choosing between a few oyster blocks for somebody who had never grown mushrooms before, Italian oysters would be near the top of the list.
Pearl Oyster Mushrooms
Pearl oysters are another common choice.
They usually have pale gray, tan, or off white caps and grow in large clusters. They are one of the more familiar cultivated oysters and tend to do well under normal indoor fruiting conditions.
They are still a perfectly reasonable beginner mushroom. I just personally lean more toward blue or Italian oysters as a first block.
Pink Oyster Mushrooms
Pink oysters are difficult to miss.
They can be genuinely bright pink, particularly when they are young. They prefer warmer conditions than blue oysters, which can make them an interesting choice in a warm climate.
They also grow quickly.
One disadvantage is that pink oysters do not store as well as some other oyster mushrooms after harvest, and much of that bright pink color disappears when they are cooked.
Still, if you want your first mushroom grow to look a little ridiculous, pink oysters do a very good job of that.
Golden Oyster Mushrooms
Golden oysters produce bright yellow clusters.
Like pink oysters, they tend to prefer warmer fruiting conditions. They can grow quickly, and part of the fun is simply watching something so unusual emerge from what looked like a white block a few days earlier.
For a first grow, I think the visual difference alone makes them interesting.
What You Actually Need
For one oyster mushroom block, you do not need very much.
You need:
- The colonized fruiting block
- A suitable temperature for the oyster variety you chose
- Humidity
- Fresh air
- Indirect light
- A way to keep the fruiting area from drying out
You do not need sunlight in the way a plant does because mushrooms do not photosynthesize.
They do respond to light, though. Light is one of several environmental signals involved in mushroom development, so keeping a fruiting block in complete darkness is generally not what you want.
Normal indirect room light is usually enough.
Strong direct sunlight is something I would avoid because it can heat and dry the block.
Opening the Block
Follow the instructions that come with your particular block because different producers package and fruit their blocks somewhat differently.
For many oyster blocks, the basic idea is to make an opening in the plastic where you want the mushrooms to grow.
You normally do not remove all of the plastic.
The plastic helps retain water inside the substrate. If you unwrap the entire block, you expose a much larger surface area to the air, which can dry it considerably faster.
Depending on the block, the instructions may tell you to cut an X or make another small opening in the bag.
The mushrooms then develop through that opening.
Humidity
Humidity is the amount of water vapor in the air.
Young mushrooms are especially vulnerable to drying out, so humidity around the developing cluster matters.
For one small fruiting block, you may not need a humidifier or any complicated equipment. Depending on the conditions in your house and the instructions from the block producer, lightly misting around the fruiting area may be enough.
You are trying to keep the environment humid. You are not trying to repeatedly soak the mushrooms themselves.
If water is constantly running down the mushrooms or collecting on the block, you may be overdoing it.
On the other hand, if developing mushrooms start drying, cracking, or stopping while still very small, dry conditions may be part of the problem.
Fresh Air
This is probably one of the easiest things for a new grower to overlook.
Oyster mushrooms need fresh air.
The fungus consumes oxygen and releases carbon dioxide. If carbon dioxide accumulates around developing oyster mushrooms, it can noticeably change their shape. They may develop unusually long stems and relatively small caps.
This creates a small balancing problem.
You need humidity, but putting the block inside something completely sealed to hold humidity also prevents normal air exchange.
So you need both moisture and fresh air.
For a single block sitting in a normal room, ordinary air movement may be sufficient. If you put the block inside a humidity tent or container, then you also need some way for fresh air to enter.
Waiting for Pins
Once the block is opened and the conditions are right, there is usually not much left to do besides maintain those conditions and watch it.
Eventually you should see small bumps or clusters forming near the opening.
These are the pins.
This is when I would start checking the block at least once or twice a day because oysters can grow remarkably quickly once they start.
The individual caps gradually enlarge and spread outward as the cluster matures.
When to Harvest Oyster Mushrooms
Oyster mushrooms are generally harvested before their caps have completely flattened and begun curling upward.
Exactly when you prefer to harvest them is partly a matter of preference, but leaving them for too long can reduce their quality and shelf life.
Mature oyster mushrooms also release spores.
Spores are microscopic reproductive cells produced by fungi. They are sometimes loosely compared with plant seeds because both are involved in reproduction, although fungal and plant reproduction work very differently.
Oyster mushrooms can release a surprising quantity of spores once mature. If you leave a cluster too long indoors, you may eventually find a layer of very fine dust around it.
For harvesting, I generally prefer removing the entire cluster at once rather than picking individual mushrooms.
The cluster can usually be cut or carefully twisted away at the base.
You Can Get More Than One Harvest
The first crop of mushrooms produced by the block is called the first flush.
A flush is a group of mushrooms produced during one fruiting period.
Once that cluster is harvested, the block may rest for a while before producing another crop. That is the second flush.
You may even get a third.
Later flushes are often smaller than the first, although biological systems are not always that predictable.
Eventually the block uses enough of its available resources that mushroom production slows considerably or stops.
That does not necessarily mean the block has become garbage.
The substrate now contains fungal tissue and organic material that has already been partially decomposed by the fungus. Depending on the original substrate, it can often be composted or incorporated into a garden.
I would rather see it become part of the soil than throw it in the trash.
What Can Go Wrong?
Even a ready to fruit block can have problems.
It can dry out.
It can get too hot or too cold.
It can have insufficient fresh air.
Shipping can stress it.
Another organism can also begin growing on the block.
That is called contamination. In mushroom cultivation, contamination usually refers to unwanted molds, bacteria, yeasts, or other organisms growing in the material you are trying to cultivate.
Not every strange looking spot automatically means contamination, but rapidly spreading green mold is one of the more obvious warning signs.
If a block becomes badly contaminated and you are unsure about the mushrooms growing from it, I would not eat them.
Sometimes a block simply does not perform particularly well. You are still working with a living organism, even though someone else already completed most of the cultivation process for you.
Which Oyster Mushroom Would I Start With?
If I were handing someone their first mushroom block, I would probably choose a blue or Italian oyster, unless the temperature where they plan to grow it makes another variety more appropriate.
Both are vigorous growers, produce the classic oyster mushroom clusters, and make it easy to see what the fungus is doing.
Blue oysters are particularly well suited to cooler conditions. Italian oysters are also vigorous and are a good general choice for a first grow.
Pink and golden oysters are probably more visually unusual.
There really is not one correct first oyster mushroom.
The important thing is that a fruiting block lets you go from a solid block of living white mycelium to an actual cluster of mushrooms without first learning sterile technique, making grain spawn, buying a pressure canner, pouring agar plates, or understanding every other step that went into producing the block.
You give the fungus somewhere to fruit, provide the conditions it needs, watch what happens, harvest the mushrooms, and then you can eat what you grew.
For a first introduction to mushroom cultivation, that is pretty hard to beat.
Where to Buy a Ready to Fruit Oyster Mushroom Block
The supplier I am comfortable recommending here is North Spore, because that is the company I have actually used. I have not used enough blocks from other suppliers to recommend them personally.
North Spore currently sells both Blue Oyster and Italian Oyster ready to fruit blocks, which are the two I would look at first for a beginner. North Spore
They also sell Spray & Grow Mushroom Growing Kits, which are even more beginner oriented. The kits come with a colonized block, a spray bottle, and instructions. Their current Spray & Grow oyster options include blue and pink oyster, and North Spore specifically describes the line as beginner friendly. North Spore
The Spray & Grow kits are a good option if you want the simplest possible first experience. You open the box, expose the block as directed, mist it, and wait for mushrooms. North Spore says its blue oyster kit can begin producing mushrooms in roughly a week under suitable conditions. North Spore
If you want a larger exposed fruiting block and something a little closer to what mushroom growers work with before moving into making their own substrate, I would look at the Blue Oyster or Italian Oyster fruiting blocks.
For current varieties, instructions, availability, and more information, see North Spore directly: